Data Exchange
In general, you can always exchange data between Vine and another Windows application using the Cut/Copy/Paste commands with the Windows Clipboard, or dragging data to and from Vine or copying data into an Excel file using the “Add to Excel” command for objects shown in a table view.
Using Clipboard
The Windows Clipboard is a common tool for data exchange between separate applications. You can cut or copy information onto the Clipboard from the Vine shortcut menu or Edit menu and then paste it into another document or application. You can also paste the external data into Vine. If Cut, Copy or Paste command is grayed, it means that you currently cannot use this operation because there is either no source or target data available to be cut, copied or pasted.
In addition, you can use the Clipboard to copy data between Vine objects, though usually it is more convenient to use Vine internal tools. For example, use the Duplicate command from the shortcut menu, if you want to create an object similar to an existing one.
Dragging Data
Data can be dragged inside and outside Vine. For example:
You can drag a web address from Internet Explorer to Vine which will automatically create a web link object for you.
You can drag a Word or Excel file to Vine to create a document object.
You can drag an object's text information or information from a list of objects into a Word or Excel document.
You can drag an email from Microsoft Outlook to Vine and an event will be created and connected to persons with the same email address as the From/To/CC address of the email. The email's subject and body will be copied to the event name and description, correspondingly.
You can drag an object from Vine to an email body in Outlook. A link to the Vine object will be created. Email recipients will be able to click the object link and have it opened in their copies of Vine
Copying to Excel
To copy objects shown in a table view into Microsoft Excel:
Select and then right-click the selected objects and choose Add to Excel from the shortcut menu. This command works even if there is no Microsoft Excel installed on your computer. The exported data will be saved to a file in Excel format and can be used with, for example, OpenOffice, and Office 365.
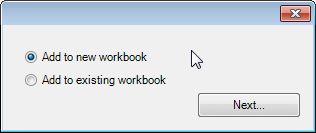
Please note that if you already have an Excel workbookand you want to apply rules and calculations already present there then you should select Add to existing workbook.
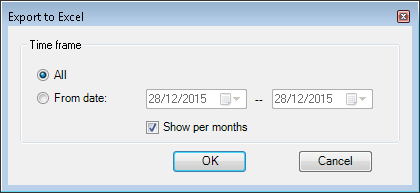
To export questionnaire results into Microsoft Excel:
Open a questionnaire and click Export To Excel. The command will export questionnaire results for a specified time period to Excel to process the data there.
Comments
0 comments
Please sign in to leave a comment.